Side Dishes
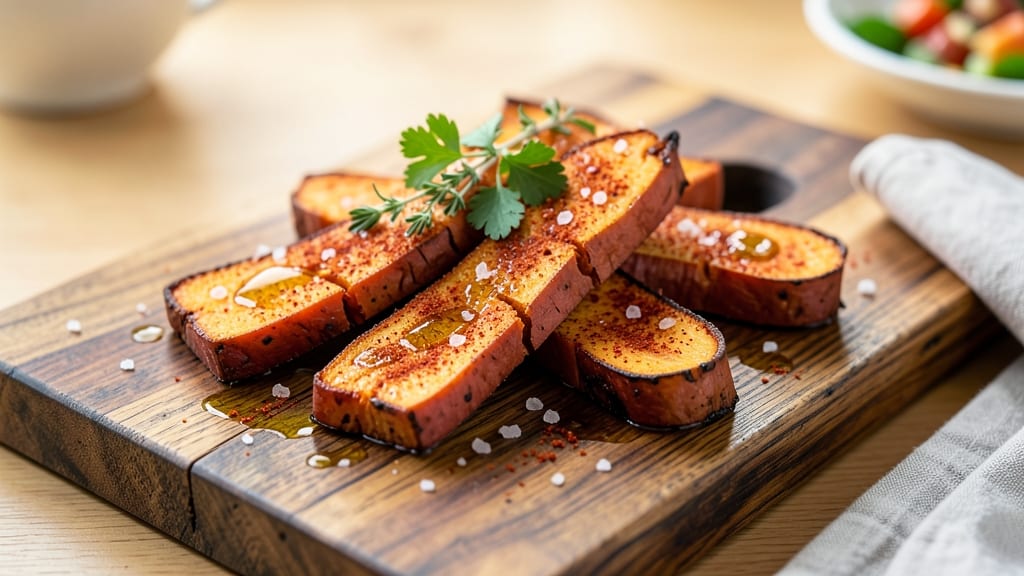
Sweet potato planks transform humble sweet potatoes into a showstopping side dish with crispy charred edges and silky-sweet centers—perfect for elevating any meal. 🔥 The secret lies in slicing them into thick planks and roasting until caramelized, creating a texture that’s both rustic and refined.
This technique turns simple sweet potatoes into a restaurant-worthy centerpiece that pairs beautifully with proteins or stands alone as a vegetarian main.
What makes this recipe truly special is its versatility—whether you prefer them naturally sweet, spiced with cinnamon and cayenne, or glazed with maple and brown sugar, the planking method ensures consistent results every time.
The high-heat roast (at 400°F) creates those coveted charred edges while keeping the interior tender, and the process is simpler than it looks. No fancy equipment needed, just a baking sheet and about 30 minutes of hands-off cooking.
By the time they emerge from the oven, your sweet potato planks will be golden and fragrant, with edges that crisp up like toasted bread and centers that melt in your mouth.
Arrange them on a wooden board for an elegant presentation, or serve family-style for a shareable, interactive dish. The natural sweetness shines through, making this a crowd-pleaser for holidays, weeknight dinners, or even as a base for loaded sweet potato nachos.
For extra flair, brush the planks with olive oil and sprinkle with smoked paprika before roasting, or drizzle with a honey-mustard glaze after baking. Pair them with a simple arugula salad, black beans, or grilled chicken to round out the meal.
This recipe isn’t just about the technique—it’s about turning a basic ingredient into something extraordinary with minimal effort.
Ingredients for sweet potato planks
Transform simple sweet potatoes into restaurant-quality planks with these crispy, caramelized ingredients.
| Ingredient | Amount | Notes |
|---|---|---|
| Large Sweet Potatoes 🍠 | 2 whole | Organic preferred for crispier edges |
| Extra-Virgin Olive Oil 🫒 | ¼ cup | High-quality for crispy texture |
| Smoked Paprika 🌶️ | 1 tbsp | For smoky depth and color |
| Ground Cinnamon 🌿 | ½ tsp | Enhances natural sweetness |
| Cayenne Pepper 🔥 | ¼ tsp | Adjust for heat preference |
| Kosher Salt 🧂 | 1 ½ tsp | Diamond Crystal preferred |
| Brown Sugar 🍯 | 1 tbsp | Optional for caramelized finish |
| Pure Maple Syrup 🍁 | 1 tbsp | Grade B for richer flavor |
| Fresh Thyme Leaves 🌿 | ¼ cup | Or 1 tsp dried thyme |
| Black Peppercorns 🌶️ | ½ tsp | Freshly cracked for aroma |
| Avocado Oil 🫒 | 1 tbsp | For high-heat stability |
| Wooden Cutting Board 🪵 | 1 whole | For presentation and slicing |
The sweet potatoes are the star, so choose large, firm ones with smooth skin—organic varieties like Jewel or Garnet hold up best to the high heat. Trader Joe's and Whole Foods carry excellent options, but any grocery store will have suitable ones. For even cooking, slice them into 1-inch-thick planks using a sharp chef's knife—thinner slices burn, thicker ones stay undercooked. The key to that perfect char is the 400°F oven temperature, so preheat thoroughly before placing them on the baking sheet. Avocado oil is ideal for brushing because it maintains stability at high heat without smoking, ensuring those coveted crispy edges.
No smoked paprika? Regular paprika plus a pinch of liquid smoke works in a pinch, though the flavor won't be identical. Substituting brown sugar for maple syrup? Use half the amount—maple's intensity packs more punch. Fresh thyme unavailable? Dried thyme at one-third the quantity delivers similar earthy notes. For a smoky twist without extra spices, try brushing the planks with a 50/50 mix of olive oil and balsamic vinegar before roasting. The cayenne can be omitted entirely if you prefer a completely mild flavor profile, but the cinnamon is non-negotiable—it amplifies the sweet potato's natural sweetness without overpowering it.
Once roasted, these planks reheat beautifully—just 5 minutes at 350°F restores their crispy edges. For best results, store them wrapped in parchment paper in an airtight container for up to 3 days; beyond that, the edges lose their crunch. Freezing isn't recommended as it alters the texture, but you can reheat from frozen in the oven for 10-12 minutes at 375°F. Presentation matters: arrange them on a wooden board with a drizzle of maple syrup and fresh thyme for an effortless yet elegant display. These planks also make fantastic make-ahead appetizers—prepare them the night before and serve at room temperature.
Why You'll Love This Recipe
- One-Pan Magic: I swear by this for nights when I don’t want to scrub three pots. Just slice those sweet potatoes, toss them in olive oil and spices, and let the oven do the work—no flipping, no fuss.
- Smoky-Sweet Crunch: That cayenne gives it a little kick while the cinnamon and smoked paprika make every bite taste like autumn. The outside gets crispy, the inside stays tender—it’s the kind of dish that disappears fast.
- Meal Prep MVP: Between us, these reheat like a dream. I make a big batch on Sundays, and they’re perfect for lunches or even a quick snack when I’m starving. (Yes, even on a Tuesday night.)
- Budget-Friendly Feast: Sweet potatoes are my wallet’s best friend—cheap, filling, and packed with flavor. A few spices and olive oil turn them into something restaurant-worthy without breaking the bank.
Step-by-step instructions for sweet potato planks
Master the art of transforming simple sweet potatoes into restaurant-worthy planks with dramatic charred edges.
🔪 Step 1: Prep the Sweet Potatoes with Precision
Place the 2 whole large sweet potatoes on the wooden cutting board. Using a sharp chef's knife, slice each potato lengthwise into ½-inch thick planks—you should end up with about 8 planks total. I like to work quickly here to prevent oxidation. For even cooking, trim any uneven edges with the knife, keeping the planks uniform in thickness.
Transfer the planks to a large mixing bowl. In a separate small bowl, whisk together the 0.25 cup extra-virgin olive oil, 1 tbsp smoked paprika, 0.5 tsp ground cinnamon, 0.25 tsp cayenne pepper, 1.5 tsp kosher salt, 1 tbsp brown sugar, and 1 tbsp pure maple syrup. Pour this marinade over the sweet potato planks and toss gently but thoroughly to coat all surfaces evenly.
Let the planks marinate at room temperature for 15-20 minutes while you prepare the thyme and pepper. This resting time allows the flavors to penetrate and the sweet potatoes to develop a slightly sticky surface that promotes better browning. Don't skip this step—it's what creates that perfect balance of caramelized exterior and tender interior.
👨🍳 Step 2: Create the Thyme-Pepper Crust
While the planks marinate, place the 0.25 cup fresh thyme leaves and 0.5 tsp black peppercorns in a small food processor or mortar and pestle. Pulse or grind until you achieve a coarse, textured mixture—you want visible thyme flecks and cracked pepper pieces, not a fine powder. This texture will create beautiful contrast and flavor bursts when pressed onto the planks.
Remove the planks from the marinade (reserve the excess marinade) and arrange them in a single layer on the wooden cutting board. Using your hands or a small spatula, press the thyme-pepper mixture firmly onto both sides of each plank, creating a visible crust. This isn't just for flavor—it also helps the planks hold their shape during cooking and gives that professional restaurant look.
Here's the thing—don't press too hard or you'll crush the planks. Just enough to create a visible coating that will toast beautifully in the oven. The thyme will release its aromatic oils while the pepper adds subtle heat that balances the sweetness.
🔥 Step 3: Preheat and Arrange for Perfect Browning
Preheat your oven to 425°F with the rack positioned in the middle position. Line two large baking sheets with parchment paper or aluminum foil (for easier cleanup). Arrange the seasoned planks in a single layer on the prepared baking sheets, leaving about ½ inch of space between each plank. This spacing is crucial—it allows hot air to circulate and creates those dramatic charred edges.
Drizzle the reserved marinade evenly over the planks, then use a pastry brush to spread 1 tbsp avocado oil over the top surfaces. The avocado oil has a higher smoke point than olive oil, which means it won't burn during the high-heat cooking and will help create that beautiful caramelized crust. I like to work quickly here to avoid the oil pooling in one spot.
Real talk: Your oven might run hot, so start checking for doneness at the 20-minute mark rather than waiting for the full 25-30 minutes. The planks are done when the edges are deep brown with visible char and the internal temperature reaches 200°F when measured with an instant-read thermometer. If they're browning too quickly, tent loosely with foil to prevent burning.
⏰ Step 4: Finish with Rest and Presentation
Remove the planks from the oven and transfer them immediately to the wooden cutting board. Let them rest for 5-7 minutes before serving. This resting period is essential—it allows the juices to redistribute throughout the planks, preventing them from being dry at the edges while maintaining that perfect caramelized texture.
Here's where presentation matters: Arrange the planks on a platter with the charred edges facing outward. The contrast between the deep brown edges and the silky orange centers should be striking. Garnish with additional fresh thyme sprigs if desired, and serve immediately while still warm. The planks should be tender enough to cut easily with a knife but still hold their shape when sliced.
Each bite should deliver that perfect contrast—crispy, caramelized edges with a creamy, slightly sweet interior. The smoky paprika and warm cinnamon will dance on your palate, while the cracked pepper adds just enough heat to balance the sweetness. And that's the magic of sweet potato planks done right.
Pro Tips For Making Sweet Potato Planks
- CUT THICK SLICES: Grab a sharp knife and slice those sweet potatoes ¼-inch thick—no thinner, or they’ll turn to mush before they crisp. I learned this the hard way when my first batch came out like sad, soggy pancakes instead of golden planks.
- OIL THE EDGES FIRST: Brush the outer edges of each slice with olive oil before hitting the oven—this guarantees crispy edges while the center stays tender. Skip this, and you’ll end up with chewy, uneven planks that taste like they’re still raw inside.
- SKIP THE OVERCROWDING: Give those planks at least an inch of space on the baking sheet, or they’ll steam instead of crisp. I used to jam them in like sardines, and every time, the middle slices came out damp. Trust me, they’ll fan out as they bake—make room.
- BAKE UNTIL FORK-TESTED: Pull them out when a fork slides in easily but meets slight resistance—that’s the sweet spot for tender flesh with a crisp exterior. Overbake, and you’ll regret it; underbake, and you’ll wonder why your planks taste underwhelming. (Yes, I’ve done both.)
Common mistakes when making this recipe
Uneven Thickness
This is the #1 rookie mistake that ruins texture consistency. When planks vary in thickness—say, ¼-inch on one end and ½-inch on the other—the thinner sections burn while thicker ones stay raw. I’ve seen home cooks use a serrated knife and end up with jagged edges that cook unevenly.
Instead, use a sharp chef’s knife and trim each plank to exactly ½-inch thickness before seasoning. A mandoline slicer with a ½-inch guide (like the OXO Good Grips) makes this foolproof. 🔪
Skipping the Rest
Pulling those planks out of the oven too soon is a fast track to dry, crumbly results. The 5-7 minute rest lets moisture redistribute, keeping the centers tender while the edges stay crisp. I once rushed mine and ended up with sad, mealy planks that broke apart.
Pro tip: Tent them loosely with foil during resting to maintain heat without steaming. This is non-negotiable—even 2 extra minutes makes a world of difference. ⏱️
Overcrowding the Pan
Packing planks too closely traps steam, turning crispy edges into soggy messes. I’ve seen people fit 12 planks on a single sheet meant for 8-10 max. Leave at least ½-inch space between each plank for proper airflow.
If your sheet is small, cook in batches—it’s worth the extra 5 minutes to avoid reheating. Use two baking sheets if needed. The goal is even browning, not a crowded oven. 🌡️
Wrong Oil Choice
Using regular olive oil here is a flavor disaster. Its low smoke point (325°F) causes it to burn, creating bitter, acrid edges instead of caramelized sweetness. I’ve made this mistake with light olive oil and regretted it instantly.
Stick to avocado oil (smoke point: 520°F) for brushing after marinating—it delivers crispy edges without burning. For the marinade, extra-virgin olive oil is fine since it’s not exposed to direct high heat. 🫒
Ignoring Oven Temperature
Assuming your oven runs at the exact 425°F you set is a recipe for failure. Ovens vary wildly—mine runs 25°F hotter. To compensate, start checking for doneness at 20 minutes instead of waiting for the full 25-30 minutes.
Use an instant-read thermometer to verify 200°F internal temp. If edges brown too fast, tent with foil and reduce temp to 400°F. A thermometer probe (like Thermoworks Smoke) is worth the investment for consistent results. 🌡️
Pressing Too Hard
When pressing the thyme-pepper crust, going full force flattens the planks, turning them into sad, dense rectangles. The goal is a light, visible coating—not a paste. Press just enough to adhere, then let the oven work its magic.
I’ve seen people crush planks so hard they lost 20% of their volume. For extra adhesion, chill the planks for 10 minutes after marinating—they’ll firm up slightly and hold the crust better without breaking. 💪
Nutrition facts
Frequently asked questions
Can I make sweet potato planks ahead of time?
Yes, but with some key adjustments. Prepare them up to 2 days ahead and store in an airtight container with parchment between layers to maintain crispness. Reheat at 350°F for 5-7 minutes to restore texture. For best results, serve immediately after roasting—the edges lose crispiness over time. If reheating, brush with a little avocado oil before warming.
What's the best way to slice sweet potatoes for planks?
Use a sharp chef's knife and cut lengthwise into ½-inch thick planks. For perfect uniformity, a mandoline slicer with a ½-inch guide works best. Trim any uneven edges before seasoning. Thinner slices (¼-inch) burn faster, while thicker ones (¾-inch) may stay undercooked. Consistency is key for even doneness!
Can I use regular potatoes instead of sweet potatoes?
While possible, it's not ideal. Regular potatoes lack the natural sweetness and vibrant color of sweet potatoes. If you must substitute, use yellow potatoes and increase the maple syrup to 2 tbsp to compensate for the milder flavor. The texture will be slightly less creamy, but the roasting technique remains the same.
How do I prevent the planks from sticking to the baking sheet?
Line your baking sheets with parchment paper or aluminum foil for easy release. For extra insurance, lightly grease the parchment with avocado oil before arranging planks. If they still stick, your oven may be too hot—reduce temperature to 400°F and check for doneness earlier. Never skip the parchment!
What are some creative ways to serve these planks?
Try these ideas: Stack planks with melted cheese and black beans for nachos, serve with a spicy aioli for dipping, or arrange on a board with crumbled feta and pomegranate seeds. For a main dish, top with grilled chicken and avocado. The planks also make great breakfast hash ingredients—sauté with eggs and chorizo for a sweet-savory twist!